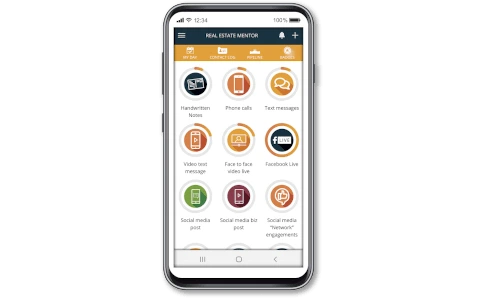
01st June 2024

C++ Compiler and Build Tools: Unlocking the Magic Behind Your Code

Compiler-Image-VS-Online-img

In the world of programming, C++ is renowned for its performance and versatility. From operating systems to video games and real-time simulations, C++ plays a major role. However, have you ever wondered how your high-level C++ code transforms into machine code that your CPU can execute? This fascinating journey involves compilers and build tools, essential for every C++ developer. Let's dive into these critical tools, their functionalities, and how you can play with your IDE.

What is a Compiler?

A compiler is a special program that translates your C++ source code into machine code, making it executable by your computer's processor. Here's a simplified breakdown of the compiler's work:

  • Lexical Analysis: The source code is broken down into tokens—basic elements like keywords, operators, and identifiers.
  • Syntax Analysis: These tokens are checked against the language's grammar rules to ensure correct syntax.
  • Semantic Analysis: This stage checks for logical consistency, such as type checking and scope resolution.
  • Optimization: The code is refined to run faster or use fewer resources. This can be turned on or off.
  • Code Generation: Machine code is produced from the optimized intermediate representation.
  • Code Linking: Different code modules (object files) and libraries are combined into a single executable file.

Why is C++ Source Code Split into Header and Source Files?

C++ code is often divided into header files (.h or .hpp) and source files (.cpp) for several reasons:

  • Modularity Headers declare interfaces like function prototypes and class definitions, ensuring consistency across multiple source files.
  • Compilation Efficiency: Changes in a function's implementation require recompiling only the source file, not all files using that function, saving time.
  • Encapsulation: Headers expose necessary details while hiding implementation specifics, improving readability and maintainability.
  • Reusability: Header files can be reused across projects without duplicating implementation code.

How Each Part is Seen by the Compiler and Linked

During Compilation:

Header Files

When included using the #include directive, the preprocessor replaces this directive with the header file's content. This makes the declarations available during compilation.

  • Declarations Headers contain function prototypes, class declarations, and macros.
  • Include Guards: Prevent multiple inclusions of the same header file, avoiding errors.
Source Files

These contain the actual implementation of the declared functions and methods.

  • Implementation: Each source file is compiled independently into an object file (.o or .obj).

During Linking:

  • Linking: The linker combines all object files into a single executable or library, resolving references to functions and variables across different object files.

This separation enhances the manageability, modularity, and efficiency of C++ projects.

Popular C++ Compilers

Let's look at three of the most commonly used C++ compilers:

  • Clang
  • MSVC (Microsoft Visual C++)
  • GCC (GNU Compiler Collection)

Let us dive a bit deeper and you explore your Visual Studio IDE.

Build and Compilation in Visual Studio

  • Build: The Build option compiles all the files in your project according to the specified configuration (e.g., .exe, .dll).
  • Compilation Only: To compile without building, press F7 (commonly in Visual Studio IDE). You can also add a compile button to the toolbar.

Task: Write a Simple Program that Prints "Hello World"

1. Write the Program:

Create a new C++ project and write a simple program that uses the header to print "Hello World":


  #include <iostream>

  int main() {
      std::cout << "Hello, World!" << std::endl;
      return 0;
  }


2. Explore Preprocessor Output:
  • As I mentioned earlier, during compilation, the preprocessor replaces the content from the included header files. Let's see this in action.
  • In your Visual Studio IDE, go to Properties -> C/C++ -> Preprocessor -> Generate Preprocessed File and set it to Yes.
processor-image
3. Open the Preprocessed File:
  • Build your project, and you will find a .i file in the output directory. This is the preprocessed file.

Did you open the preprocessed file? What did you see? More lines than the actual code?

Understanding the Preprocessor's Role:

The preprocessor copies the contents of the header file and pastes it into your actual file. This is why you see the definitions and declarations from in the .i file.

Do you understand how the preprocessor works now? It’s amazing to see how the code expands before actual compilation, isn't it?

Exploring Object Files and Assembly Output

Curious about opening the .obj files?

1. Open the Object File:

Try to open an object file (.obj on Windows, .o on Unix-like systems) in any text editor.

Did you see a series of binary numbers or some strange ASCII characters?

  • Explanation: The object files contain the machine code that your CPU can execute. However, they are not directly executable on their own because they still need to be linked with other object files and libraries.
2. Generating Assembly Output:

In Visual Studio, go to Properties -> C/C++ -> Output Files -> Assembler Output and set it to Assembly-Only Listing.

assembly-output-image
3. Open the Assembly File:
  • Build your project again. Open the generated .asm file in your output directory to see the assembly code generated by the compiler.
  • Did you check out the assembly file? Can you recognize the instructions? This is a human-readable form of the low-level instructions that the CPU will execute.

Understanding the Linker:

  • After generating the object files, the linker combines them, resolving references using symbol tables. It produces the final executable (.exe) or dynamic link library (.dll) files that your CPU can execute.
  • Object files contain machine code, but they are not directly executable. After the linker completes its work, the resulting .exe or .dll files are ready for execution by the CPU.

Task: Observe the Size of the Actual .cpp File and .obj File. Is There Any Noticeable Difference? Why?

I hope you can figure it out.

The Importance of Target Architecture and Platform

"Before we proceed, there's an important point you need to understand. C++/C code depends on the architecture and platform it is intended to run on. Confused? When you are using Visual Studio, at the top you can select Debug or Release configurations and also choose the architecture (like x86 or x64), right? Ever wondered why? Let's break it down:

target-architecture-image

Before the compilation process, we inform the compiler about the target architecture, OS, and platform for which this program has to run. The compiler then translates the high-level code into machine code specific to that architecture.

This is crucial because different architectures have different instruction sets, calling conventions, and binary formats. For example, x86 (32-bit) and x64 (64-bit) architectures have different machine instructions. Similarly, ARM architecture, which is often used in mobile devices and embedded systems, has a different set of instructions compared to x86/x64 used in most desktops and laptops.

C++ compiler also depends on the operating system. This dependency manifests in several ways, including system calls, libraries, executable formats, development tools, environment headers, and compiler options. The compiler must generate code that is compatible with the OS-specific conventions and interfaces to ensure that the resulting program runs correctly on the target system.

By specifying the architecture and platform in the build settings, you ensure that the generated executable or library will run correctly on the intended hardware. This also helps in optimizing the code for performance and efficiency on that particular architecture.

This is an overall view of the compilation process. Please explore the different types of compilers and their features.

Diving into Build Tools

Build tools automate the process of compiling, linking, and managing complex projects with multiple source files and dependencies. Here's an overview of some popular build tools:

Make and CMake
  • Overview: One of the oldest and most widely used build tools, utilizing Makefiles to define build rules.
  • Features: Simple syntax, platform support on Unix-like systems and Windows, highly customizable.
  • Use Cases: Ideal for Unix-like systems, smaller projects, and when direct control over the build process is needed.
CMake
  • Overview: A higher-level build tool that generates platform-specific build files and acts as a Build System generator.
  • Features: Cross-platform support, integration with various compilers and IDEs, modern C++ support.
  • Use Cases: Suitable for larger projects, cross-platform development, and integration with different build systems.
Ninja
  • Overview: A high-speed build system designed to work with higher-level tools like CMake.
  • Features: Focused on speed, minimal overhead, fast incremental builds, and scalability.
  • Use Cases: Projects requiring very fast build times, often paired with CMake.
MSBuild
  • Overview: The build tool for Microsoft Visual Studio, using XML-based project files.
  • Features: Deep integration with Visual Studio, flexible build configurations, highly extensible.
  • Use Cases: Windows-centric development, particularly for .NET applications and Visual Studio projects.

Task 1: Explore the OpenCV Project

1. Explore the OpenCV Project:
  • OpenCV is open-source and popular.
  • Go through the documentation and try to build it.
  • You will see you have to get a CMake build for it with any platform selected.
  • Understand why it uses CMake build.
Questions to Consider:
  • Why does OpenCV use CMake for its build process?
  • What benefits does CMake provide for cross-platform development?
  • How does CMake simplify the build process across different operating systems?

Key Points to Search if You Haven't Understood:

  • What is a cross-platform build?
  • Configuration files on different platforms.

Task 2: Build an Executable in Linux and Try to Open it in Windows

1. Build an Executable in Linux:
  • Write a simple C++ program and compile it to produce an executable in Linux.
Questions to Consider:
  • What format is the executable file generated in Linux?
  • How does this format differ from executables in Windows?
2. Transfer and Try to Open in Windows:
  • Transfer the executable file to a Windows machine and try to run it.
Questions to Consider:
  • Did the Linux executable run on Windows?
  • Why or why not?
  • What are the differences between executable formats in Linux and Windows?
  • What tools or methods can be used to run Linux executables on Windows, if any?

Conclusion

Understanding C++ compilers and build tools is essential for efficient and effective software development. Whether you're using Clang, MSVC, or GCC, and building with Make, CMake, Ninja, or MSBuild, these tools streamline the complex processes of compilation and linking, enabling you to focus on writing great code.

Choosing the right tools for your project is crucial. Explore more about the specific build tools in detail. Try out all the different options in the Visual Studio properties and explore everything.

Let's develop your ideas into reality