07th June 2024
Write Less Code, Do More: Component Generation in Angular

Angular is a popular framework for building dynamic web applications. One of its powerful features is the ability to generate components easily using the Angular CLI (Command Line Interface). This article will walk you through the process of generating a component in Angular, detailing the files that are created, and providing project structure snippets for a comprehensive understanding.
Prerequisites
Before we start, ensure you have the following installed:
- Node.js: Download and install Node.js
- Angular CLI Install Angular CLI globally using the command:
npm install -g @angular/cli
Step-by-Step Guide to Generate a Component
- Create a New Angular Project (if you don't have one already):
    ng new my-angular-app
    cd my-angular-app
- Generate a New Component: To generate a new component, use the following command:
ng generate component my-new-component
- Alternatively, you can use the shorthand:
ng g c my-new-component
Files Generated After Running the Command
When you generate a component using the Angular CLI, it creates several files and updates some existing ones. Here's a breakdown of the generated files and their purposes:
- Component TypeScript File (my-new-component.component.ts): This file contains the logic for your component. It defines the component's selector, template URL, and style URLs.
    import { Component, OnInit } from '@angular/core';

    @Component({
      selector: 'app-my-new-component',
      templateUrl: './my-new-component.component.html',
      styleUrls: ['./my-new-component.component.css']
    })
    export class MyNewComponent implements OnInit {
      constructor() { }

      ngOnInit(): void {
      }
    }
- Component HTML Template (my-new-component.component.html): This file contains the HTML structure of your component.
    <p>
      my-new-component works!
    </p>
- Component CSS File (my-new-component.component.css): This file contains the styles specific to your component.
/* Styles for my-new-component */
- Component Test File (my-new-component.component.spec.ts): This file contains the unit tests for your component.
    import { ComponentFixture, TestBed } from '@angular/core/testing';
    import { MyNewComponent } from './my-new-component.component';

    describe('MyNewComponent', () => {
      let component: MyNewComponent;
      let fixture: ComponentFixture<MyNewComponent>;

      beforeEach(async () => {
        await TestBed.configureTestingModule({
          declarations: [ MyNewComponent ]
        })
        .compileComponents();
      });

      beforeEach(() => {
        fixture = TestBed.createComponent(MyNewComponent);
        component = fixture.componentInstance;
        fixture.detectChanges();
      });

      it('should create', () => {
        expect(component).toBeTruthy();
      });
    });
- Update to Module File (app.module.ts): The Angular CLI automatically updates the app module to include the new component in the declarations array.
    import { NgModule } from '@angular/core';
    import { BrowserModule } from '@angular/platform-browser';
    import { AppComponent } from './app.component';
    import { MyNewComponent } from './my-new-component/my-new-component.component';

    @NgModule({
      declarations: [
        AppComponent,
        MyNewComponent
      ],
      imports: [
        BrowserModule
      ],
      providers: [],
      bootstrap: [AppComponent]
    })
    export class AppModule { }
Project Structure Snippets
After generating the component, your project structure should look something like this:
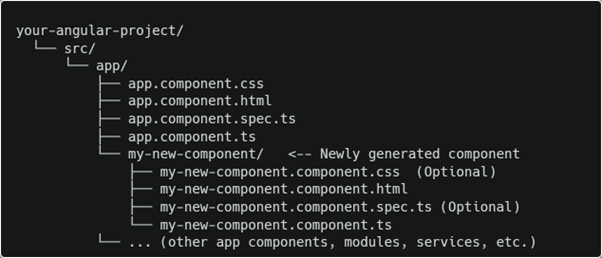
Detailed Explanation of the Files
1. my-new-component.component.ts:
- The @Component decorator marks the class as an Angular component and provides metadata, including the selector (app-my-new-component), template URL, and styles URL.
- The class MyNewComponent implements the OnInit interface, which means it should have an ngOnInit method that Angular will call once the component is initialized.
2. my-new-component.component.html:
- This file contains the HTML that will be rendered when the component is used. It currently has a placeholder paragraph.
3. my-new-component.component.css:
- This file is for styles specific to this component. Styles defined here will only apply to this component.
4. my-new-component.component.spec.ts:
- This file contains the setup for unit tests using Jasmine. It includes basic test configuration to check if the component is created successfully.
5. app.module.ts:
- The module file is the entry point for Angular applications. It organizes components, directives, pipes, and services, and imports other modules. When a new component is generated, it is declared here, making it available throughout the application.
Conclusion
Generating components in Angular using the Angular CLI is a straightforward process that significantly speeds up development. By understanding the files generated and their purposes, you can better manage your Angular projects and maintain clean and organized code. This detailed guide should provide a comprehensive foundation for generating and using Angular components in your applications.