31st May 2024
Building a Scalable Micro Frontend Application with React: A Step-by-Step Guide

Managing large-scale projects and their codebases can be challenging for development teams. Micro-frontends, though not a new concept, are gaining popularity due to their distinct benefits.
Micro-frontends allow multiple teams to work on individual modules of a single project independently, without affecting other modules, regardless of how many modules are added to the existing system.
In this article, we’ll explore the fundamentals of micro-frontends and demonstrate how to implement one using React. We’ll also discuss the benefits of integrating micro-frontends into your applications. Let’s dive in!
Introduction to Micro-Frontends
The current trend in web development often involves creating a monolithic frontend application that operates atop a microservice architecture. However, as various development teams contribute to this monolithic frontend, it can become increasingly challenging to maintain. This is where microservices can offer a solution.
Micro-frontends extend the microservices concept to the frontend. Essentially, a micro-frontend aims to treat a web application as a collection of features managed by different, independent teams with distinct missions. Each team handles everything end-to-end, from the database to the user interface.
Micro-frontends do not adhere to a specific structure and have no fixed boundaries. As your project evolves, you may need to adapt and refine your micro-frontend approach over time.

Best Practices for Micro-Frontends
When implementing a micro-frontend architecture, here are some best practices to ensure a smooth and efficient development process:
Isolate Team Code
Each team should develop its features as independent applications. Avoid using shared states or global variables. This means there should be no runtime dependencies, even if all teams use the same framework.
Establish Team Prefixes
When complete isolation isn't feasible, teams should agree on namespace ownership to prevent conflicts. This applies to CSS classes, events, local storage, and other shared resources.
Build a Resilient Web App
Each team's features should be resilient. Ensure that the features work even if JavaScript is disabled or encounters errors. Emphasize performance by utilizing universal rendering and progressive enhancement techniques.
Use Native Browser APIs Over Custom APIs
Favor using browser events for communication between different parts of the application rather than creating a custom global pub/sub system. This approach keeps cross-team APIs straightforward and reduces complexity.
Advantages of Using Micro-Frontends
Micro-frontends enhance the maintainability of web applications by breaking them down into manageable pieces. This approach follows the principle of divide-and-conquer, which is particularly beneficial for large-scale applications.
Here are some key advantages of using a micro-frontend architecture:
Deployment and Security
One of the significant benefits is the ability to deploy individual components independently. Services like Vercel can handle multiple repositories with different frontends, regardless of the language or framework. Alternatively, deployment platforms such as Netlify can be used. Each micro-frontend can be treated as a standalone frontend once deployed.
To ensure security, SSL certificates like Wildcard, single or multi-domain, or SAN SSL certificates can be used. A single SAN or multi-domain SSL certificate can secure multiple sites and subdomains effectively.
Technology Agnosticism and Scalability
Micro-frontend architecture allows the integration of various languages and frameworks within a single project, such as React, Vue, and Angular. Each frontend team has the freedom to choose and update its tech stack independently without needing to coordinate with other teams.
Faster Development
Teams can develop and deploy their frontends independently, without dependencies on other modules. This autonomy enables quicker releases and iterations, speeding up the overall development process.
Easier Learning Curve
Managing isolated application features is simpler for new developers compared to understanding a monolithic frontend. This linear learning curve reduces onboarding time and costs while increasing productivity.
Vertical Domain Ownership
Previously, vertical domain ownership was feasible only on the backend through microservices architecture. Micro-frontends bring this concept to the frontend, allowing independent teams to own and manage components from the database to the UI.
Code Reusability
Micro-frontends promote code reusability. A component developed and deployed by one team can be reused across multiple teams, enhancing efficiency and consistency.
Easy Testing
Micro-frontends facilitate easier testing. Teams can thoroughly test individual components before integrating them into the broader application, reducing the likelihood of bugs in the final product.
Additional Benefits
Other advantages include a smaller, more maintainable codebase and the flexibility to quickly add or remove modules from the system as needed. These benefits make micro-frontends a powerful approach for managing large-scale web applications.
React’s Role in Micro-Frontend Architecture
React is well-suited for developing micro-frontends due to its component-based architecture and support for modular web development. It works seamlessly with various state management libraries and context providers, making it an ideal choice for micro-frontend architectures.
One of the key advantages of using React is its robust ecosystem and strong community support. There are numerous libraries and tools available for React that can be integrated into micro-frontends, such as those for routing, state management, and UI component libraries. These resources enhance the development process and make it easier to build and maintain micro-frontends efficiently.
Steps to Build a Micro Front-End Application with React
In this guide, we will create two projects using the create-mf-app package: one as the host application (host-app) and the other as a remote application (products-list). We will expose two components from products-list and consume them in host-app.
Prerequisites
- Latest version of Node.js and npm installed
- Basic knowledge of React and webpack.
1. Set Up the Project Structure
Create a root directory for your project and subdirectories for micro-frontend and the host application:
In the root directory run the create-mf-app command to create micro-frontends.
npx create-mf-app
Provide the application details like name, framework, webpack etc.
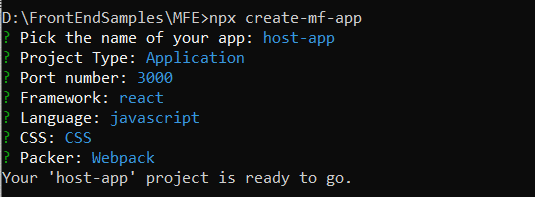
For products-list micro front end, choose a different name and port, product-list and Port:3001.
after creating two apps your project structure look like this

2. Install dependencies in Each Micro-Frontend
we'll install the necessary dependencies for Webpack Module Federation. This plugin will help us integrate the micro-frontends into the host application.
create-mf-app configures application with necessary dependencies and plugins. It could be a little challenging if we were configuring webpack manually. create-mf-app does it for us.
If you are looking for more control over webpack configurations, It is recommend to configure them manually.
npm install
This command installs webpack, webpack-cli, html-webpack-plugin, webpack-dev-server, and webpack-merge as development dependencies.
Run this command and install these dependencies in each of micro-front-end project.
Run the following command to see the micro-front-end is running without any dependency issues.
npm run start
By this your micro-frontend could be running locally at configured port.
3. Implementing the micro-frontend applications.
In our micro-frontend implementation, the products-list application will contain and expose two components: `Products.jsx` and `ProductsCategory.jsx`. The host-app will import and consume these components.
To implement this, in the src directory of the products-list application, create two components: `Products.jsx` and `ProductsCategory.jsx`. Add the following respective code snippets to `Products.jsx` and `ProductsCategory.jsx`:
  import React from 'react'

  function Products() {
    return (
      <div>This is Products section</div>
    )
  }

  export default Products
  import React from 'react'

  function ProductsCategory() {
    return (
      <div>Products Category Menu</div>
    )
  }

  export default ProductsCategory
Import these two components in `App.jsx` and render them.
  import React from "react";
  import ReactDOM from "react-dom";
  import ProductsCategory from "./ProductsCategory";
  import Products from "./Products";

  import "./index.css";

  const App = () => (
    <div className="container">
      <ProductsCategory/>
      <Products/>
    </div>
  );
  ReactDOM.render(<App />, document.getElementById("app"));
Now product-list app should give output like this

4. Adding Module Federation
As noted above, the host-app needs to consume the Products and `ProductsCategory` components from the products-list application. To achieve this, we need to implement module federation.
We'll start by transforming the Products and `ProductsCategory` components in the products-list application into micro-frontends so that they can be utilized by other applications.
Open the webpack.config.js file in the products-list application, which has already been created and configured by the create-mf-app package. Next, update the exposes property in the `ModuleFederationPlugin` configuration as shown below:
  plugins: [
    new ModuleFederationPlugin({
      name: "product_list",
      filename: "remoteEntry.js",
      remotes: {},
      exposes: {
        "./ProductsCategory": "./src/ProductsCategory.jsx",
        "./Products": "./src/Products.jsx"
      },
      shared: {
        ...deps,
        react: {
          singleton: true,
          requiredVersion: deps.react,
        },
        "react-dom": {
          singleton: true,
          requiredVersion: deps["react-dom"],
        },
      },
    }),
The `remoteEntry.js` file serves as a manifest for all the modules exposed by the `products-list` application.
To complete our setup, copy the URL of the manifest file `localhost:3000/remoteEntry.js`, and then update the `remotes` property in the `ModuleFederationPlugin` configuration in the `webpack.config.js` file of the `host-app`, as shown below:
  new ModuleFederationPlugin({
    name: "host_app",
    filename: "remoteEntry.js",
    remotes: {
      productsList: "product_list@http://localhost:3001/remoteEntry.js",
    },
    exposes: {},
    shared: {
      ...deps,
      react: {
        singleton: true,
        requiredVersion: deps.react,
      },
      "react-dom": {
        singleton: true,
        requiredVersion: deps["react-dom"],
      },
    },
  }),
The code above specifies that the host-app has a remote micro-frontend application called products-list that shares its module with it. With this setup, we can access any of the components exposed from the products-list application.
Now, update the `App.jsx` component of the host-app application with the shared components, as seen below:
  import React from "react";
  import ReactDOM from "react-dom";
  import Products from "productsList/Products";
  import ProductsCategory from "productsList/ProductsCategory";
  import "./index.css";

  const App = () => (
    <div className="text-center">
        <h4>This is Host app, Below components are from mfe</h4>
        <Products/>
        <ProductsCategory/>
      </div>
  );
  ReactDOM.render(<App />, document.getElementById("app"));
Restart the development server after the above changes.
After restarting the development server, you will see the following in your browser:

Based on the code and the displayed UI, it's evident that we've successfully shared components between two applications using micro-frontends.
Other options for communication between micro-frontends include:
- Event-based communication: Using a publish/subscribe model for micro-frontends to communicate with each other without being directly coupled. This approach is suitable for micro-frontends that operate independently and need to notify others about certain events without sharing a lot of data.
- Shared libraries/State management: Utilizing shared libraries or state management solutions (like Redux) that can be accessed by multiple micro-frontends to manage and synchronize state. This is useful for scenarios where micro-frontends need to share and manage a global state or when there are complex data dependencies between them.
- Context API: Leveraging React’s Context API to provide a way to pass data through the component tree without having to pass props down manually at every level. Context API is ideal for passing down common data or functions to deeply nested components within the same micro-frontend or across closely related micro-frontends.
Micro-frontend challenges and solutions:
- Styling consistency: Ensuring consistent styling across different micro-frontends can be challenging, especially when they are being developed by different teams. Using CSS-in-JS libraries like Styled Components or Emotion in React micro-frontends can encapsulate styles at the component level, avoiding global conflicts.
- State management across micro-frontends: Managing state across micro-frontends, especially when actions in one micro-frontend need to update the state in another, can complicate state management. Using shared state management libraries like Redux or Zustand with careful namespace management ensures smooth state synchronization. Implementing a global event bus or leveraging the Context API can also enable state sharing and actions across micro-frontends.
- Versioning and dependency management: Micro-frontends may depend on different versions of libraries or React itself, leading to potential runtime issues or bloated bundle sizes. webpack’s Module Federation allows you to share libraries across micro-frontends, ensuring that only a single version of React and other shared libraries are loaded.
In conclusion, micro-frontends offer advantages over monolithic frontend applications and other setups. They are easy to adopt and maintain among teams, and they manage frontend building and security elegantly.


